
Reflective Journal
Unit 1

1.
Today is the first day of uni and we already started to make things. The task was to observe and extract the special feature of the object and then make something with that inspiration. One thing I really learned about is observing is not just simply look at the object. The key is to use different senses at the same time and have a comprehensive understand of that object. And even sometimes we can use deliberately use less senses, the result maybe astonishing.
2.
The fast-making festival is to make 10 objects in 10 days. It doesn't need to be complicated designs. The aim is to think less and just get on making. During the process I found out that this a really good idea to collect waste materials and just get inspired by those materials. I always thought that I need to sort out everything before the making process such as idea and manufacture details, but now I realized I can just simply let the work lead the way.


3.
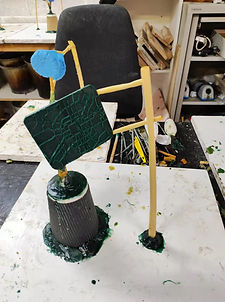
During the fast-making festival, we need to make a tool and use that to make something else. So, I just went down to the school junk yard to collect free materials (New materials are really expensive). Fortunately, I got myself two different saw blades, which were in quite good shape. I fixed one and used the other one to make a clock which turned out really cool. The crucial thing about recycle is not just reused the material, the story and special attachments with people is what make it interesting.
4.
While collecting materials from the junk yard, I found this really good-looking board. It was covered completely by all colours of paint. I thought it was a board used by the fine art students and now it was the most brilliant material I got. I made it into a space theme sculpture, a tool box and a part of the saw. Sometimes the best art may not always be created intentionally. The best bit of life is those random moments that surprised us with its great and unique beauty.


5.
The clock I made with the saw blade broke two days after I finished it, which was really funny. After opened the back cap of the clock core, I found out it was a gear that decoupled. It was not a easy fix because I glued the clock core to the back of the blade so I could only change the gears in side. I did manage to fix it though but it was quite a struggle. If I ever gonna make something that should last long and fixable, I should definitely come up with a more flexible way to fix things. I used a broken gear for decorations which also turned out great. Sometimes losing something is gaining something at the same time.
6.
Today's work shop at Chelsea was a fun medal making process. We can use clay to get any shape or texture from all the things around us. I got the print of a well cap and the tyre print of a 1972 Lambretta scooter, which was a great historical motorbike. And I even met the owner of that bike. This is the time when I really enjoy design and making, because you got to observe the world more carefully and I can always find beauty which I will definitely ignore before and get to meet interesting people.


7.
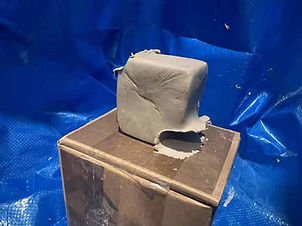
The medal work carried on for weeks because we are going through the whole process of all kinds of mould and wax pieces. I think it's really fun to collect object that are produced during the making process of all of us. For example, this piece of plaster would be wasted because it was cured but it can be a perfect accessories plate. All we need is to keep our passion and curiosity.
8.The final design of my medal project had taken me ages to figure out. I finally decided to make something that represent myself. I redesigned my logo, added my stamp on it. This stamp means a lot to me it was made by my calligraphy teacher when I was 5 years old, and I have been using it for 18 years. The back of my medal is the road map of my hometown Beijing. It reminds me no matter where I go and what I do I should never forget where I'm from and the profound culture that had been engraved to my soul.

9.
I made a 3D model of my medal project and then have it 3D printed in UV curable resin. The only problem is that we didn't have a UV light for final curing. Then I just leave it under the sun and let nature finish the work. This leave me wondering that I can actually create some project that involve natural random features. I remembered an artist using willow branches moving in the wind to paint which also inspired me. I may try this idea later.
10.
I already did my silicone mould and the plaster base of the flexible silicone mould. Then it came to the process that I need to cast wax into the mould then I could have a wax medal for the bronze casting later. The small gap in the mould I created to let the air escape became a real big problem. I wasn't thinking about gravity that these holes can cause leaking of the wax, which happened tragically. This cause me a lot of extra time to do the wax casting again. The reason I made this mistake is that I was simply told to leave those gaps but never did give it a careful thinking of the reason and how it works. We need to learn and reflect on the things we learn so that we can apply the knowledge to our work in a most suitable way.

11.model making at Chelsea
Today's task was to put the casted wax medal on the wax tree due to last times failure of casting that at the first time. The wax tree came fine but today was the time I have to squeeze to fit in my schedule. It was always important to leave some time on the schedule vacant for mistakes. I shouldn't just believe that everything would turn out just like I planned and which most of the time doesn't.


12.
I always wanted to learn how to make ceramics and I intended to make something in ceramics for my unit 1 project. So, I decided to give it a go. I bought some porcine and watched some videos on YouTube. Then I found it's extremely hard than it looks like. I was really struggling to get the clay in the centre of the machine. I struggled for hours then get this very first finish. Thanks to the help of my classmates. I found out it's always better learn something in person than learn it by books and videos.

13.
I have been practice throwing cups and pots for a while I thought I got the hang of hand throwing. The crucial things about throwing are, first I need to make sure that there are no air bubbles in the clay and then I need to keep my hand real steady. I should rest my arms on something steady, instead of leave it hanging, otherwise it won't be steady no matter how hard I press the clay. Sometimes designing and crafting is like that, we really need to get hold to something, like an idea or a passion otherwise we could easily lose our way.
14.
I started the work of the 3 objects of the ILEA collection object to object project. my first object should be something like a lamp or a set of pendant lamps which I didn't quite decided yet. First, I did some test on the material I want to use, clay. I would throw it on a machine first, trim it and then make the penetration look with a sling shot. The one I chose was a ceramics sculpture that look like a vase and have a very interesting curvy hollowed-out shape on its body. This shape mostly inspired me to all the work that I conducted during the whole unit.


15.
I tested the penetration effect of a sling shot on different shape and thickness of clay. I found out that wet clay is really ideal for sling shot. When the clay is wet like it’s just been thrown, a sling shot can penetrate it really easy and leave a beautiful flower like edge on the front and back of both holes. I found out that although wet clay is ideal to create the penetration effect, it is very difficult to throw a pot that is too wet and almost impossible for it to be remove from the throwing machine. So, the clay should be in a proper humidity. And taller shape outcomes have better look than the short ones.
16.
After doing the so-called shooting part, I did the firing test of the shot objects. At first, I thought the flower shape fake bullet holes will crack and fall off when the object become dry. But when it dried it was still holding although it was really fragile even a gentle touch could break it off. I was afraid that it might crack during the firing process but after the biscuit fire, everything turned out just fine.


17.
Today, I was throwing and trimming the final lampshade. I used earth ware clay for higher success rate a stuck projectile in the final lampshade. I used different kinds of projectiles, mainly ball bearing balls, but I also tried screws and nuts, which also added a very artistic texture of the hole. This stuck one was created unintentionally but I really liked it so I kept it.


18.
Today I did the lighting test of the final lampshade.
I used a 240V 33watt 370 lumen 2800k light bulb for my lamp set to create a warm and cozy atmosphere. The testing result was quite satisfactory but the light bulb could create a lot of heat so I need to use heat resistant and insulated material to fix the cable of the lamps.


19.
Today, I soldered the cables of the lamps and put all the parts together.
In order to let the cable, hold the weight of the lamp shade, the cables need to be strong. The power of the light bulb is also quite high, so it needs a solid connection otherwise, it might catch fire. I made these ceramics cable stopper to let the cable hold the weight of the lampshade and this material is insulated and high temperature resistance. I fixed the lamps to a wood board that has function as a ceiling.


20.
I started to make the switch of my lamps. The inspiration of this design is the handle and the trigger part of the world-famous machine gun M2HB. I decided to use walnut and steel to make a switch of my lamps. The switch core is a qualified product, so it will be safe to use the switch. Whenever I make something practical with function, especially when that item is involved with dangerous things like electricity or other power sources, safety is always number 1 priority.


21.
Today I was pre-processing the walnut wood for the switch. First, cut, polish and chamfer the formwork according to the size. Then the part that needs to be processed by the lathe is pasted with white glue. Because I didn’t have clamps, so I put the wood under the drawer cabinet to keep pressure on it. Then I did the 3D modelling of the switch. The inspiration of this design is the handle and the trigger part of the world-famous machine gun M2HB. It is good to have a overview of something I’m making, 3d modelling really helps a lot.


22.
Today I was making the handle with lathe. Before processing, I asked the technician about the use of the lathe. He found that my wood was not firmly bonded together. He said it might be damaged during processing. But I decided to give it a try. As he said, the wood broke at the bonding points. Now I know that it is better for me to ask the technician first before I do something even if that is something I thought I already know.


23.
Looking at the cracked wood, I thought I can enhance the imperfection. Since the handle is broken, it will simply develop on the basis of imperfection. On the premise of ensuring safety, I used the leftovers of the same kind of wood to ignite the damaged handle. This accidental accident gave me a new opportunity to develop the concept of destruction is a form of creation. And the outcome is also really nice.


24.
Today's task was to assemble the main structure. I drilled screw holes and bound wood pieces with white glue. The wood pieces were carefully chamfered but still some of the parts didn't fit that well. This was quite normal during handmake objects. Always have patience is the key to make things right.


25.
Finally comes to the testing of switch mechanism and final assembly. Although I glued a lot of the parts together, still the whole switch is fixed together by bolts and nuts. I did this because I want it can be fixed easily if the switch core inside is broken. When it comes to designing something that should last a long time, I thought important to think of all the possibility ahead and plan for it.


26.
I made a 3D model the cylinder of the flower pot.
I used the 3D modelling software to draw a model of expected output, flatten its side according to the plane, and get the plane expansion diagram with conic boundary. Then import the file into the ion cutting machine to process the required iron plate. Then bend the iron plate into a cylinder with a plate bending machine, and finally weld the upper bottom and top surface. It's much cheaper to used metal sheets and roll it up than using a piece of pipe and cut it.


27.
Today's job was sealing the cylinder and do a watertight test.
I used silicone sealant to seal the welding part of the iron plate to make it watertight.
The waterproof test was not successful at the first time. After the leak point was
found and blocked, the test was successful then. However, the bare metal cylinder can rust quite easy. Next time I should add a rust proof layer inside.


28.
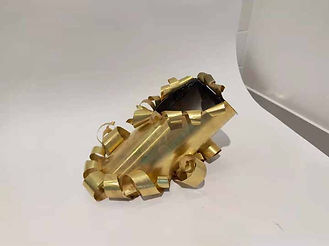
I was applying brass sheet on the steel cylinder to make it look like a gun shell.
Cut and bond the brass sheet. Because the brass sheet is only 0.3mm, it cannot be welded. At the same time, I also tried to use soldering iron and blow torch with flux for soldering.
However, the bonding force of this kind of solder is not enough to support its strength, so I have to use epoxy resin adhesive for bonding the two materials together.


29.
I bent the sheet to fit the bottom of the shell. Like a real gun shell, the bottom should be a little bit bigger than the cylinder. So, I added a different plate and a small piece of steel plate to make it looks like the primer. I punched a hole on the steel plate to make it look like it’s been fired. The brass plate is quite thin so I need to cut it every 1 cm so it can roll up. We should always think before we start to work with new materials. I failed 3 times to get the cylinder and the bottom join together, the thin brass always breaks off.
30.
The final process is to cut and bend the brass sheet. I cut the brass sheet with scissors and roll up its edge with pointed-nose pliers to create an effect of curling the edge caused by explosion. Now I found out it was a really bad idea to glue metal together. The part with glue was very difficult to bend and when I did that the binding breaks off a little. Next time I need to come up with a better idea to join the brass sheets.


31.
The final process is to cut and bend the brass sheet. I cut the brass sheet with scissors and roll up its edge with pointed-nose pliers to create an effect of curling the edge caused by explosion. Now I found out it was a really bad idea to glue metal together. The part with glue was very difficult to bend and when I did that the binding breaks off a little. Next time I need to come up with a better idea to join the brass sheets.
Unit 2

1.
I went to see the collect show at the Somerset House and saw this work by Daniel Mirchev. This work is made of birch plywood and is also hand carved. I was really impressed by the surface of the finish because the layer of the plywood is vertical to the layout of this whole piece, which make a perfect contrast of this wavey form of the whole piece. It also let me to reflex on the way I use materials. I always trying to find the suitable material for my work base on its characteristic. For example, like this art piece, if I’m gonna make something out of plywood I would never use it layer vertical to its layout because it breaks easier. But this may lead me missing a lot more ascetic outcome.
2.
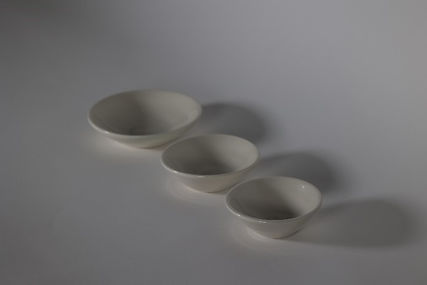
Looking back on the products and designs I saw at the collect show, this particular item really inspired me. Rice is the most important grain in Asia. And bowls are often the container. But what if function and materials can switch places. This can some time lead to more interesting creation. This object kept me thinking about how I mind storm my ideas. I can possibly put every element down on a chart and start making changes and swich something’s places and see what I got.


3.
Looking back on the products and designs I saw at the collect One of the most important things I learned about on the collect show was being a designer or a craftsman, I need be able to promote and advertise my own work and have a clear evaluation of my work. Sometimes when I look at my own work, I tend to see less value than it actually has. And I realized that I need to form my own style of works, letting people to recognise my work right away. That’s the best stage I can get as a maker so I better start working on that real quick.

4.
My unit one work is on display in the cabinet in our library. This is actually the first time my work is on a show or anything like that. After helping putting up this mini show I realized all the show are carefully curated and placed. Every position and items were carefully placed and considered. And this time because the cabinet doesn’t have power source so it didn’t show its function, so next time when I’m showing anything I need to consider the showing environment as well.

5.
This is the second batch of my ceramic works. This is the first time that I tried to throw things with porcelain clay. This clay is a little bit hard to work with because it’s very soft and doesn’t have much of toughness. And it’s more likely to wobble and crack during firing. This plat have a cracked bottom and I tried to fix it with glaze but it failed. Now I know the best way to keep from having that problem is to make a lot in one batch so it will always have sufficient amount of pieces with good quality.
6.
I tried more throwing with porcelain clay and this time is quite successful. I found out that I didn’t have any plan or sketch before I throw everything. I just follow when ever I came up with during the whole process. Although this may seems like a limited design or making but when I tried to make something similiar I just can’t do it. This is when I realized I need to learn how to throw in a more systematic way and need to keep on practicing. It is always never too late to empty the cup and learn it properly.


7.
I always thought the language development is kinda useless before untill today. We had a really fun role play on our language development class in which we pretended to be designers and reviewer ect. I got the role as a designer who was trying to sell my work on a show and trying to get a furniture design deal from a hotel owner. Then I realized I was so weak at expressing my own design ideas and explian it to others when people ask for my introduction. If I ever want to start my own workshop that will be very important and I should really seize every opportunity to practice from now.
8.
I continue the making of these porcelain pieces I threw the other day. It’s already leather hard so it’s time to trim the clay. But when I tried to trim it I found my trimming tool keep bouncing on the clay and leaving this uneven tool marks on the surface. So I went to ask James for suggestion and a tutorial. Then I found out I was holding the tool too lose and the clay is too dry to be trimmed. But I really like the texture of the tool mark. The goal is to have more control before going in to exploring the random features. I believe that’s how the skill should be learned and developed.


9.
This is the second batch of my ceramic works. This is the first time that I tried to throw things with porcelain clay. This clay is a little bit hard to work with because it’s very soft and doesn’t have much of toughness. And it’s more likely to wobble and crack during firing. This plat have a cracked bottom and I tried to fix it with glaze but it failed. Now I know the best way to keep from having that problem is to make a lot in one batch so it will always have sufficient amount of pieces with good quality.

10.
Today’s language development is about the structure of our critical research paper. Before this I was really stuck with my CRP and have no idea what should I write about and my mind is trapped in my way of writing a engineering paper. Because at first I thought I really need to come up with a solution or a design to solve the problem. Now I see the difference between those two and the meaning of critical is to summerise my own opinion from others previous works.
11.
Today we had a lecture given by Tim Carson. He talked about his practice in a very intresting way which actually inspired me about the way I’m gonna tell my own story in the future. One thing is certain that punk never actually died. It kept on living in every rebel’s heart. When we are given two art work to choose, one is contians the memory of an aged lady’s late husband, the other is the last product of a factory went out of buiness with profound history. Tim let us vote for which one to keep and which one to smash and there wasn’t a second option. People voted for the lady’s memory to keep. And later we found out that it is the 8th time that piece survived. Though I choose the same thing but it still put me in deep thought about why people choose this. I think my conclusion is this story is easier for people to relate and resonate. And this can be a huge part of the value of a art work.


12.
This is the second batch of my ceramic works. This is the first time that I tried to throw things with porcelain clay. This clay is a little bit hard to work with because it’s very soft and doesn’t have much of toughness. And it’s more likely to wobble and crack during firing. This plat have a cracked bottom and I tried to fix it with glaze but it failed. Now I know the best way to keep from having that problem is to make a lot in one batch so it will always have sufficient amount of pieces with good quality.


13.
Today I went to the ceramic workshop for a tutorial with our technician James and had a throwing lession properly. It turned out that all the techniques that I fugured out on my own is either ineffective or wrong. My biggest problem is always centring the clay and can’t really get it right. Today I learned that putting my elbow on my waist and lean forward and push the clay is the mosy effective way. This tutorial really helped me a lot now my trowing technique is becoming way betterm and faster than before.

14.
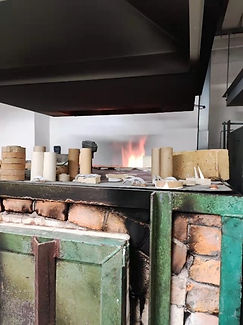
Today I tried mixing glaze on my own and get my piece in the gas klin get it to be reduction fired. At first I thought when glaze became thicker and thicker we can just pour water in and mix it up then we are good to go again but it’s always not that simple. And the long handle broke off before biscuit firing but I managed to fixed it. The main reason it breaks of is the clay is already bone dry when I tried to put handles on so the slip will dry out really quickly at the joint and it crakes. It always a painful reminder when I learn it the hard way.

15.
The pieces that were reduction fired came out the klin today and the result was not what I'm expecting at all. The pieces all came out in different colors and patterns although I use the exact same clay and glaze. One of the repair handle also breaks off and the long handle are bent because it's weight and porcelain’s nature during high fire. The color is different because the tempreture in the kiln is not the same so the reduction is not very even. I kinda like this effect because it can not be planned or replicated. Also if I want the handles to be in their up right position, I need to put it on with an angle up so when it turned soft in the klin it will come down slightly and be in the right angel. This is a really fruitful try out.
16.
I made these flower pots for Bie and tried different glaze and the different way to apply glaze.This time I use white stoneware clay. This clay is way easier to work with than porcelain because it’s more firm and flixiable at the same time. The toughness of this clay is very ideal. Then I applied a indigo high fire glaze on it with brush. I used to dip glaze so as you can see the painted glaze is not that even. Although it looked even after I painted it, it still looks different after the firing. So it’s important to control the thickness.


17.
Today I tried to make a batch of exact same mugs or cups. I used porcelain clay this time and I got a ruler to measure the hight and the diameter of the cup. After I done several pieces I realized that it’ quite hard to keep the same hight and the diameter and the same thickness of the wall. So I asked Nol for suggestions. Then I learned that I should weight the clay before I throw them. So it will be easy for me to control all factors at the same time. Also rtimming is also important to keep the pieces looks the same.
18.
Now the clay is leather hard so I trimmed it and install handles on it. When I trimmed it something random happened. My trimming tool starts bouncing on the clay and couldn’t be able to cut through the surface of the clay and creating a wavy texture on the wall of my cups. At first I thought it’s the clay is a bit too dry then I went down stairs to consult James. I learned that it’s because I was holding the tool too loose and if I want to get rid of that texture I can only use the sharp end of my trimming tool to cut lines that are a bit deeper than usuall because the pressure is higher so my tool won’t bounce off.


19.
Now the clay is leather hard so I trimmed it and install handles on it. When I trimmed it something random happened. My trimming tool starts bouncing on the clay and couldn’t be able to cut through the surface of the clay and creating a wavy texture on the wall of my cups. At first I thought it’s the clay is a bit too dry then I went down stairs to consult James. I learned that it’s because I was holding the tool too loose and if I want to get rid of that texture I can only use the sharp end of my trimming tool to cut lines that are a bit deeper than usuall because the pressure is higher so my tool won’t bounce off.

20.
Today I made a batch of bowls. The plan was to make a batch of exact same bowls to test out the theory I concluded last time when I tried to made those cups. This time I weigh the clay and used a ruler to control the diameter and the hight and the result is quite nice. The only problem here is the bottom size is still not that acurrate but the general shape is very similar. One pice have a broken sopt on the edge because I turned the wheel too fast the clay cracked due to the centrifugal force. Now I know it’s also important to control the speed to fit the clay’s toughness.
21.
Tanvi‘s classes are very helpful and inspiring. When the first time I was asked to do a self-evaluation on the vocational aspect, I have no idea how to do it. To be honest I was quite lost in thinking about what to do in the future because that thought stressed me out so I just tried to overlook the fact that I will graduate very soon and have to face this problem. Talking to Tanvi helped me to understand myself better and gave me a better understanding of myself and what I'm good at and what to improve in the future.


22.
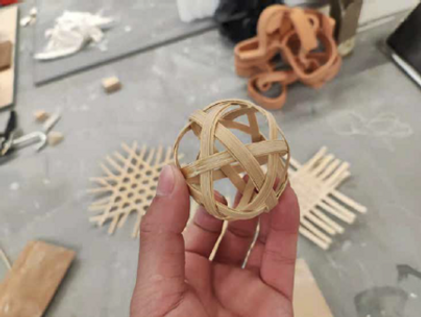
Today I started bamboo weaving. The idea is try to explore the possiblities of combining traditional Chinese handicraft with electronic arts. Bamboo weaving is the first technique for me to try. I bought some materials and learned how to weave the bamboo strips in to flat pattern. So this is what I achieved: two vertical crossed pattern and one hexagon crossed pattern. These are all traditional pattern that been used for tounsands of years. The sphere shape one is also one of the oldest form of bamboo weaving objects. It's a perfume bag for people to carry. These samples I made gave me a more specific understanding of bamboo weaving and help me develop my practice and ideas.

23.
I also tried to weave clay strips using the same technique of bamboo weaving. I made clay slap with the roller then cut it into strips. During this whole process, I realizewaeving clay is very hard because there are a lot of hard turns when the clay strips overlap each other and in order to work with clay strips thin as this I need to be very carefull and the clay also need to be a big hard. So when these two factors add up the clay strips breaks at the overlapping point and it doesn't stick to each other without any slip. I learn that it's not always ideal to apply same technique to different materials when trying to create something new. Experiment is the most important part.


24.
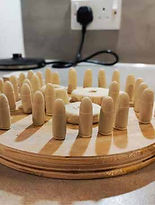
Now that I tried the flat pattern of Chinese traditional bamboo weaving, I felt like I can try something three dimensional. The first thing I tried is this round pattern to join the bamboo strips and use a mold to form the shape of the piece. The mold is hard cardboard cylinder wrapped in clean foil to keep it from water. It's quite hard to find the right order of the strips for it overlaps each other and lock each other tight. But I managed to get it right at the 3 attempt. Then I shaped the bamboo using the mold but I got the top finish wrong so I ended up with a pineapple shape. Generally this shape is way more.harder than the flat ones but I will keep trying.


25.
This time I finally got the lantern shape finished. It's been the traditional way of making lanterns in Anhui Province, China for a long time. This shape is designed so elegantly that it doesn't use a single joining component it just overlaps and weaved together and it holds Its shape. Mine is not that perfect because the shape is slightly distorted I should keep the bamboo wet the whole time but I let it dry out too much during the weaving process. And once it's finished it's quite hard to get something inside. So if I want to put electronics inside then I have to plan carefully.


26.
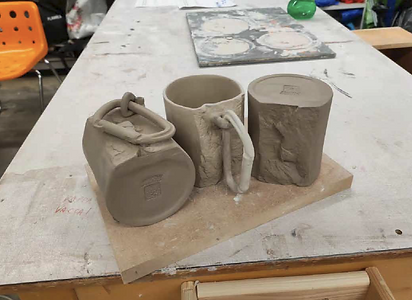
Inspired by the traditional rice paper with flowers inside I decided to try something new. Mug I threw is the mixing clay with tea leafs inside. The leaves are the tea I drank and I collect it then I mixed it in when I was weiging the clay before throwing. The tea leafs breaks when I weded it so there's no big chunks when I tried to throw it. it's quite smooth and the finish is quite beautiful.


27.
This frame is for weaving optical fibre. Due to the characteristic of optical fibre, the friction in between each strip is very low so each strip is quite hard to stick together and keep the shape of the two-dimensional woven piece. This frame is 3D printed and carefully designed with mortise and tenon structure to hold together each piece. The assembly will contain LED inside the frame so when the optical fibre is woven, the LED matrix can shine the light inside the optical fibre and the lighting sequence can also be controlled by the micro control unit.

28.
Inspired by the traditional rice paper with flowers inside, I tried to put flowers on ceramic works. The only problem is flowers and any other herbs or plants will burn away during the firing process so this is the first attempt to keep the shape of the flower. I stick the flower petals on the biscuit-fired pieces with wax and then glaze them regularly. The result turned out not as good as expected. The glaze dripped in the kiln and destroyed the shape of the flower but this is worth trying.
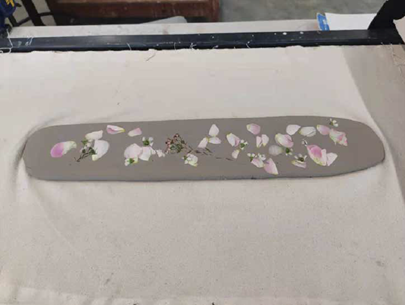

29.
This is another attempt to embed the flower petals into ceramic pieces. This time I put the flower and plants inside wet clay before building. I divided the clay into two different groups by the different techniques I used. The first group was thrown and the second group was hand built. The throwing group didn’t turn out well because the plant inside the clay was in chunks so it got in the way during throwing. I tried different amounts of flower petals but every piece didn’t turn out the way I wanted. The hand-built piece turned out amazing. This is probably the technique that I would carry on making.
30.
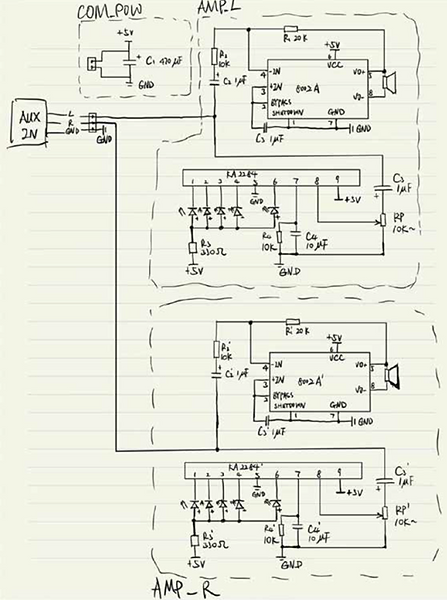
After determining the project for the third unit, I conducted research and design on the technical part of circuit art. Finally, I decided to use an 8002A success rate amplifier to create a sound module. This success rate amplifier can drive a speaker with an impedance of 4 ohms and a rated power of 3 watts. Simultaneously use the ka2284 AD conversion module to convert sound signals into digital signals to control the brightness of the LED array. Make it compatible with music.


Unit 3
31.
After determining the project for the third unit, I conducted research and design on the technical part of circuit art. Finally, I decided to use an 8002A success rate amplifier to create a sound module. This success rate amplifier can drive a speaker with an impedance of 4 ohms and a rated power of 3 watts. Simultaneously use the ka2284 AD conversion module to convert sound signals into digital signals to control the brightness of the LED array. Make it compatible with music.
1.
During unit 2, my aim and objective are to the aim of my work is trying to discuss how modern technology has destroyed the traditional handicraft industry and how it can help give the craft a new life. The objective of my work is to explore a possible way that integrate traditional Chinese handicrafts into the design and production of functional modern electronic artworks.
However, when I made those woven objects and the circuit sculptures and then combined them, I found out the sound quality and the link between craft and technology is not strong or obvious. So, this kind of product won’t have a good market. In this case, it won’t make enough profit to help the development of rural areas in China.

2.
Then I started to question myself why do people need craft and technology combined? And also, technology seems like it’s going away from users. With the development of electronic products, the design of products gradually tends to become a black box, depriving users of the joy of discovering the subtleties of the product while using it. Users can't see what is going on inside and what is going on.

3.
Then I did some research on this question then I found out that the main reason. It’s about complexity. Technology is becoming so advanced, segmented and specialized for people to comprehend with common sense. However, complexity shouldn’t be the obstacle for users to approach technology and ongoing studies and research are discussing the concept of explainability of technology like Bryce Goodman and Seth Flaxman (Goodman & Flaxman, 2016). They believe that it’s important to provide individuals with explanations when algorithmic systems make decisions that impact them.


4.
Also, in the book "The Black Box Society: The Secret Algorithms That Control Money and Information", the author Frank Pasquale urges for greater transparency, accountability, and ethical considerations in the development and use of technologies (Pasquale, 2016). People do care about the technology in their lives although it might be hard to understand because inevitably technology is going to affect our lives more than ever. Therefore, I believe that technology products can showcase their principles and internal components to users, to bridge the gap between users and technology, partially dispel their concerns about the black box of products, and also showcase another industrial aesthetic style to users.
5.
Relating to my practice, craft is more approachable than technology. Craft is tangible and visible, very easy to get hands-on experience. It can be in all forms and all kinds of accessible materials. It’s full of creativity and personalization and more importantly, craft is cultured and has a strong connection to human heritage. Craft can certainly help with human well-being and has positive effects on the craft makers by fostering feelings of self-managing and empowerment (Pöllänen, 2015). It’s very easy to put all kinds of spice into craft and make us more human.


6.
Therefore, the combination of technology and crafts is a feasible means to bring users and technology closer together. According to sociologist and historian Richard Sennett, in his book “The Craftsman” he states the value of craft in modern society and the relationship between craft and technology. Sennett recognises the importance of both tradition and innovation in craftsmanship. While acknowledging the value of traditional skills and practices, he also emphasises the need for craftsmen to adapt to changing circumstances and incorporate modern technologies when appropriate (Sennett, 2023).
7.
Peter Vogel (9 March 1937 – 8 May 2017) was a German artist who is famous for his interactive circuit sculptures and sound art installations. His works perfectly combine art with modern electronic technology. His work “The Sound Walls” can be seen as a sculpture, but to be fully appreciated the sounds need to be triggered as well by the interaction with the viewer or performer. In this sense, Vogel’s Soundwalls are open works, which are only completed by the viewer (Jean Martin, 2011). In Vogel’s work, the user is immersed in the technology and becoming a part of the installation itself creates a strong bond between people and technology.

8.
Ross Lovegrove is a highly influential industrial designer known for his innovative and organic approach to design. Lovegrove is known for his organic design philosophy, which often draws inspiration from natural forms and structures. His work is a harmonious combination of art, technology and nature resulting in forms that are both functional and aesthetically unique (Lovegrove & Antonelli, 2007). His organic and fluid design language inspired by nature shows comfortable aesthetics and has a strong connection to nature. Organic designs can give the user a sense of softness and timelessness. His cross-disciplinary practice is also a great example for me to draw experience from.


9.
Élisabeth Joulia was a french artist and ceramicist. Living in an assumed austerity, she is inspired by nature to draw, paint, and create sculptures and pieces of everyday use. Joulia has become a myth and a reference in the world of ceramicists. With her most famous works, “Almonds” and “Blooms”, she seeks to express the essence of the vibrations of life (Fritsch).
I saw Joulia’s work “2 « Chestnuts » Vases” on London PAD show 2023. I was deeply inspired but the way of joining two different shapes of ceramics together and creating a harmonious form as a set.


10.
This is the eramic back box I made for Unit 2’s speaker, trying to test out the sound quality and the feasibility of ceramic speaker idea. But the sound quality only improved a little bit which means for backbox designing i need to consider more technical factors. When I was testing the back box, i found out that this without calculation box can only enhance the volume of the speaker but not the sound quality. The sound is very bad, it sounds like the speaker is covered and the sound is somothered. So it definetily need a redesign.

11.
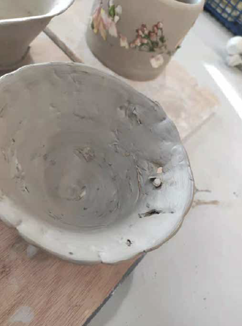
This is the first slip casting test. First, I hand thrown a cup then cut the wall. Then textured a slab with broken plaster edge to create this kind of rock texture the joint the two piece together into a whole cup. inorder to prevent iy from collapsing while poring the plaster, i put more clay body inside the cup for support. Then i cast the plater mould the cracked it open. The mould making is quite successful. But I forgot to build the rim of the cup higher for more clay to be cut off.
12.
The casting piece turned out quite good. I tried to cast many pieces in one day to test how will the casting time be different when casting continousily because the mould will be wet and it keeps getting wetter. Then i find out as the scal of this mould the casting time should be 5min more each time and i can only do 5 or 6 cast before i need to get the mould to dry agian. Also i found out that casting slip is good for joining pieces together.
13.
The test firing turned out quite nice, althought glazing this piece is very hard. My goal is to keep the rock textured part unglazed so it will stay rough like real rock and the carabinerand the clip need to stay loose so i need to make sure the glaze won't stick two piece together. So I painted the wax on the part i don't want glaze. After i glazed it i found it was really hard to clean the glaze off the wax because the glaze dried on the wax. There should be a better way for kepping glaze off this kind of surface i just need to experient more.


14.
This was the first back box enclosure prototype i tried to throw. It was very big, in fact this is the biggest piece i ever tried to throw. The whole piece weigh 8 kg and itwa s really hard to center and open the center hole. I have to throw and measure at the same time to achieve the size i wanna get. Heating the piece with heat gun really helped when closing the shape at the top otherwise the pice will collapes.Keeping the wheel dry is also very important.


15.
After trimming the piece, the shape i want came out quite good. In order to trim the piece like this I also need a cylinder to support the shape on wheel so it won't sit in itself. but when i trimed the bottom, the shape was a bit too wet then sit in anyway. Also it is very hard to center something as big as this while trimming.i had to make a slab and paste that on the bottom to get the shape back.


16.
Making the first batch of plaster mould.
the reason i use slipcasting in stead of hand throwing is as you can see the thrown piece have very different thickness so the sound quality is difficult to guarantee. But slip casting is different to throwing, the thickness of the piece is very even and there is not inner tension caught inside the clay when forming the piece so it is less likely gonna crack and deform.

17.
Making porcelian casting slip.
I obtained precise technical details for making ceramic slip, and through continuous experimentation, I obtained the theoretical basis for preparing casting slip. At the same time, I also pointed out the problem of incomplete variable control in the viscosity and thixotropy testing of slip in the book. After realizing the sum of this problem, I also proposed corresponding solutions in my future practice.

18.
First firing test, directly to 1260 degrees, placing on the rim of the openning. the 1260 firing test failed, the piece wobbled and distorted because when fire to 1260 degrees porcelian will become very soft in kiln so big overhang shapes won’t stay as they were. I will try to fire the piece at a lower temputure to see if the situation will improve. And also try to make the piece thicker so the structural strenght will be better.


19.
Then i did another firing test at 1220 degrees, there is a small improvement but considered this time also failed. these firing test takes so much time, I did not have enough time to explore the safe firing temperature of porcelain castings with large arc-shaped overhanging surfaces. In the end, the work was only completed at the safest temperature of 1060 degrees Celsius.

20.
The low fire porcelian turned out really good. after a wet sanding the surface became really smooth and acieved a very touchable warm mat finish. The sanding is very important process. First the clay dust is very harmful for people to enhale and choosing the grit of the sand paper is also very tricky. I used 100p to 1000p to get the fine finish i want. Also the rim of the piece also need to be sand into the same size for the electric conponents to assemble.

21.
I did the reasearch on how to design the encloser of a speaker. Ifound out that the material and the shape is not the main issue of designing the box, the volume of the box is the main problem. It is the air inside the box that vibrate with the speaker cone while playing the sound. The volume for each spearker or driver can be caculated by these paramaters from these equations. This is the T/S parameters of a driver and can be found on the manual of it which makes designing the encloser easier.

22.
I did the computer simulations on the drivers i chose on the programme winISD
a full range driver, dyton audio PS95-8, with a closed backbox as we can see the bass will not be very good. so I iterated my design. So i changed the backbox type in to ported then i find out the bass is well enhanced and it Improved dynamic response performance. But the sound quality is still not good enough for me so i decided to make a different kind of drivers.


23.
To achieve the best acoustic design effect, I should use ported enclosurte type and use a cross over type which means i will split the signal into 4 channels for high frequency and the bass. so i choose a new set of drivers and I iterated my design. after i did the simulation on a ported backbox with the driveri choose TCP115-8, DSN25F-4 at the cross piont 3600Hz, the result turned out good.The backbox volume and the diameter of the port is caculated by the TS parameters of the drivers i choose.

24.
This is the amplifier I design for my speakers. Each drivers has one apmlifier to enlarge the signal from devices like phone or pc without any distortion.The power amplifier i choose is LM1875T made by texas instruments. It's a 35w audio power amplifier very suitable for my design. It's powered by 12V DC so it's safe for people to touch the exposed wiring. The power of this amp is enough for this speaker design for it' only for household using.


25.
I drew sketches for the final piece I wanna make and figured out how i want to finsh my already made piece. The cone shape was inspired by the woven object i made during unit 2. The final speaker has 4 channels so it need 4 individual ceramic backbox and the shape need to join together harmoniously. In order to make that organic shape, I drew some flowing lines then try to find a shape from the lines i drew. Then after made up my mind with the shape, i will start 3d modeling.


26.
With the sketch of the shape, i use it as the sector of the shape then 3D model it with rhino. I calculated the volume of this shape which is 7.12L but without the electric conponents and the tube, the volume will be correct around 6.8 L. Then I 3D printed the shape out to make plaster mould. The printing was quite rough on the surface so i have to put on filler to make it smooth. Once it's sanded, it can be ready for casting.

27.
Making mould like this big is really hard and tricky. I have to build clay wall to cast the mould in 3 different pieces. And the 3D print was very light and hallow inside so it will float when pouring the plaster inside. And the bubbles in the plaster mould also cause some problems. I don't have enough time to wait for the mould to dry completly so the casting process takes a long time. But the pieces came out ok.

28.
These pieces came out from the mould ok but there are soem really annoying thing that i can' fix in time. first is the bubbles in the pieces. There are bubbles in the slip when i casted it. i think that's because i didn't filter the slip. That cause pin holes on the piece . also when the bigger piece is drying, it sit in because of gravity and there is nothing i can do about that. i will try to prevent this from happning next time i do cast as big as this.


29.
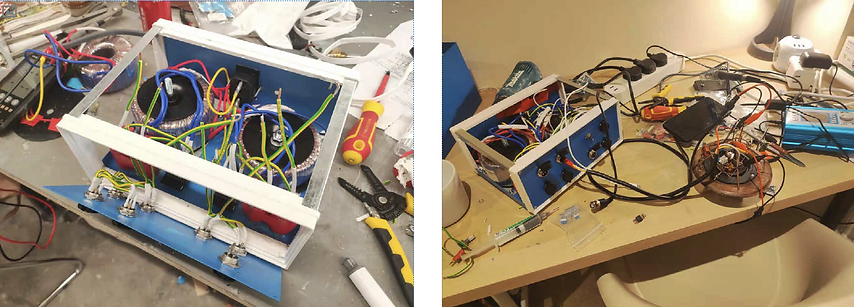
After i made the amplifier circuit sculpture from the circuit design i did then i tested the amplifier with signal generater and oscilloscope. amp is working perfectly. Then i was very confident to make the amplifier circuit sculpture of the crossover type of speaker. In order to display at the show i made a control box for all sets of speakers. It combine the power supply and the signal source, including a bluetooth reciever for users to connect to ther devoce and play music.


30.
The final cascade tuning experiment is very successful. Then to the final assembly. Then drivers are all working pretty good and with the backbox the sound quality is very much improved. The only problem of this set is the power amplifier generates a lot of heat. So that can be a problem but now the speaker is working just fine and it can play music continusly for a long time. So generally i'm really happy with the the final result.